


How to measure windows for curtains accurately
TL;DR:
- Accurate window measurements are essential for well-fitting and aesthetically pleasing curtains.
- Properly measuring involves understanding window types, determining rod placement, and accounting for fullness and hardware.
- Small measurement errors significantly impact the final look, so double-check all dimensions before ordering.
There is nothing quite as frustrating as ordering beautiful curtains, hanging them with care, and then stepping back to realize the panels are too short, too narrow, or bunched in all the wrong places. That scenario plays out in thousands of homes every year, and it almost always traces back to a single cause: imprecise measurements taken before the order was placed. Knowing exactly how to measure windows for curtains is the foundation of every polished, well-dressed room. This guide walks through the entire process, from assembling your tools to handling unusual window shapes, so you can order with confidence and install results that look intentional.
Table of Contents
- Gathering your tools and understanding window types
- Step-by-step instructions: Measuring for width and height
- Allowing for fullness, overlap, and hardware
- Measuring unusual windows and troubleshooting mistakes
- Why getting measurements right matters more than you think
- Next steps: Upgrade your windows with custom curtains
- Frequently asked questions
Key Takeaways
| Point | Details |
|---|---|
| Measure from intended rod | Always start your measurements where you plan to install the curtain rod for best fit and look. |
| Add width and fullness | Curtains should be 2 to 2.5 times the width of your window for a luxurious, custom appearance. |
| Check rod height | Mounting the rod higher visually elevates your room and improves curtain drape. |
| Plan for hardware | Account for brackets, returns, and special features before finalizing your measurements. |
| Adjust for window shape | Use special methods for bays, arches, or unusually shaped windows to ensure a perfect custom curtain fit. |
Gathering your tools and understanding window types
Once you understand what’s at stake with incorrect measurements, the logical next step is getting properly prepared. A few inexpensive tools and a clear understanding of your window type will save you from the most common and costly measuring errors.
What you need before you start
Gather these items before touching a single wall:
- Metal tape measure (cloth tapes stretch and give inaccurate readings)
- Step stool or ladder for reaching the upper window frame and crown molding
- Notepad and pencil to record measurements immediately
- Level to confirm your rod placement is straight
- Painter’s tape to mark intended rod positions on the wall
Clean the window area before you begin. Move furniture, remove existing valances, and wipe down the window trim so nothing obstructs your tape measure. An unobstructed line of sight from top to bottom is essential.
Common window types and what each requires
Different window styles call for slightly different measuring strategies. Here is a quick reference:
| Window type | Key measuring consideration |
|---|---|
| Single or double hung | Standard approach; measure full frame width |
| Picture window | Wide span; rod must extend well past frame |
| Bay window | Measure each section individually |
| Casement window | Watch for crank hardware clearance |
| Arched window | Straight rod below arch; measure to arch base |
| Sliding glass door | Full panel width; consider stacking clearance |
For curtain measuring basics, understanding your window type is the first step toward choosing the right panel configuration.
Pro Tip: Before you measure a single inch, decide where your rod will actually hang. Rod position significantly affects how tall a room feels. Mounting close to the ceiling or crown molding makes walls appear taller and ceilings higher, a visual trick that designers rely on regularly. Always measure from your intended rod position, not from the top of the window frame itself.
Step-by-step instructions: Measuring for width and height
With your tools ready and windows cleared, you can now measure with precision. Follow these steps in order, and record every number twice to confirm accuracy.
Measuring for height
Height is the first dimension to capture because it drives your rod placement decision.
- Decide on rod height. Mark where the bracket will sit. Most designers recommend 4 to 6 inches above the window frame or as close to the crown molding as practical. Higher rod mounting visibly elongates a room and is a widely used design technique.
- Mark the bracket position with painter’s tape. Use a level to confirm both marks are even before measuring.
- Measure from the bottom of the rod down to the floor. This is your finished curtain length. Subtract 0.5 inch if you want a floating hem (for café or kitchen curtains) or add 1 to 3 inches if you want a puddle effect for formal draping.
- Record this number and measure again. Confirm the figure on both sides of the window, since floors are not always perfectly level.
Measuring for width
Width measurement is where many homeowners make the most significant errors.
- Measure the full width of the window frame from outside edge to outside edge.
- Add the rod extension. Martha Stewart advises extending the rod 4 to 12 inches past each side of the window frame for drapes and curtains, which allows panels to stack clear of the glass when open, maximizing light.
- Total the rod length. This is the number you use to calculate how much fabric your panels need to cover.
- Record and double-check. Measure the full rod span twice before finalizing.
Standard vs. designer width and height approaches
| Measurement | Standard approach | Designer approach |
|---|---|---|
| Rod height above frame | 2 to 4 inches | 4 to 6 inches or at crown |
| Rod extension per side | 2 to 3 inches | 4 to 12 inches |
| Panel length | Sill or apron length | Floor length or slight puddle |
| Fullness ratio | 1.5x window width | 2 to 2.5x window width |
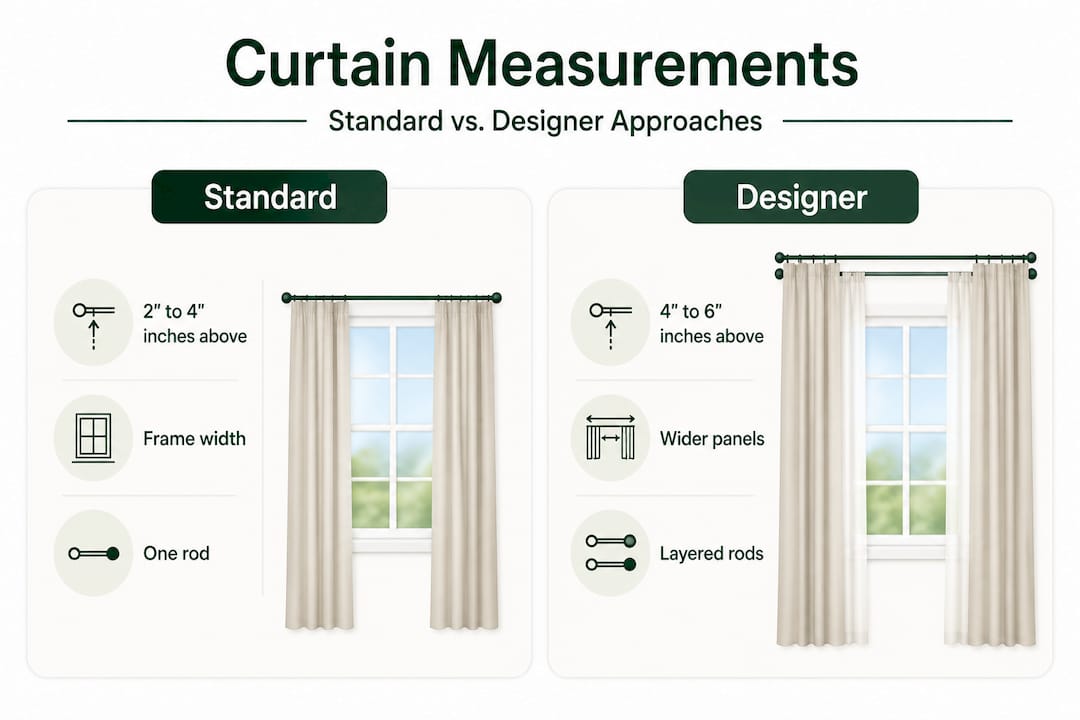
Understanding curtain rod placement correctly from the start prevents you from having to re-order panels or reposition hardware. The designer approach almost always produces a more refined result because the proportions feel intentional rather than minimal.
Different aesthetics call for different curtain styles, and each style has specific measurement requirements. Pinch pleat panels, for instance, need more fabric than rod pocket or grommet styles, so knowing your header style before measuring is important.
Pro Tip: If you are unsure whether your curtains should touch the floor or float above it, consider the room’s use. Kitchens and bathrooms benefit from a floating hem for easy cleaning, while living rooms and bedrooms look more polished with panels that just graze the floor.
Allowing for fullness, overlap, and hardware
With basic dimensions captured, the next layer of precision involves fullness ratios, side returns, and hardware offsets. These adjustments separate a tailored, professional result from a flat, skimpy-looking window treatment.
Understanding curtain fullness
Curtain “fullness” refers to how much extra fabric is gathered relative to the rod or track width. A fullness ratio of 1:1 means the fabric is exactly as wide as the rod, which produces a flat, undersized appearance. Proper fullness depends on the panel style:
- Sheer panels: 2.5 to 3x the rod width for a soft, airy look
- Pleated drapes: 2 to 2.5x the rod width for structured volume
- Grommet or tab-top panels: 1.5 to 2x the rod width
- Rod pocket panels: 2 to 2.5x the rod width
For drapery fullness basics, the general rule for most residential applications is to aim for at least 2x fullness for a result that looks intentional and well-appointed.
Side returns and overlap allowances
The “return” is the distance from the outer bracket to the wall surface. This measurement matters especially for blackout curtains or panels intended to block light effectively. When panels return to the wall, light gaps on the sides are eliminated. Add the return distance (typically 3 to 5 inches per side) to your total panel width calculation.
Overlap at the center is equally important for two-panel configurations. Each panel should overlap the center by at least 1.5 to 2 inches so the seam closes cleanly when panels are drawn shut.
Accounting for rod hardware
Different hardware types shift the measurement baseline:
- Rings and clips: Add 0.5 to 1 inch to your finished curtain length since the ring itself adds height between the rod and the panel top
- Rod pocket headers: Subtract about 0.5 inch from finished length since the pocket sits directly on the rod
- Traverse rods and tracks: Measure the actual track length, not the window frame width
“Always measure from the intended rod position, not from the top of the window frame. Higher rod mounting near the ceiling or crown elongates the room and is one of the most reliable design strategies for making any space feel larger and more refined.”
Ignoring hardware offsets is one of the most common reasons curtains hang either too high or too low after installation. A half inch of miscalculation at the header becomes visible immediately once panels are hung.
Measuring unusual windows and troubleshooting mistakes
Special window configurations require careful thought before measuring. Bay windows, arched windows, and oversized picture windows each present challenges that standard measuring approaches do not fully address.
Bay windows
Bay windows consist of three or more angled sections joined together. Treat each section as a separate window:
- Measure each panel section individually from its intended rod position to the floor.
- Account for the angle at each corner. A separate rod or a flexible bay window rod system handles the turn.
- Add return allowances at the outermost panels so they wrap neatly back to the wall.
- Confirm that your panel stack-back (the space panels need when drawn open) does not block the window entirely on narrow side sections.
Arched windows
Most homeowners hang a straight rod below the arch, treating the flat rectangular portion of the window as the treatment area. Measure the width of the flat section and follow standard width guidelines. If you want panels to cover the arch itself, a specialty curved rod or a fabric shade mounted within the arch cavity may be the better solution.
Unusually large or small windows
For very wide windows, consider a center support bracket to prevent the rod from sagging under the weight of heavy fabric panels. For small windows in tight spaces, a rod that extends far past the frame (up to 12 inches per side) makes the window appear significantly larger while allowing full light access when panels are open.
For custom window measuring tips, non-standard shapes sometimes need professional consultation before placing a fabric or panel order.
Troubleshooting common mistakes
If your measurements feel off or your curtains are not hanging correctly, work through this checklist:
- Curtains are too narrow: Recalculate with at least 2x fullness and add return allowances.
- Hem is uneven: Re-level your rod brackets and confirm floor measurements on both sides.
- Rod is crooked: Use a level and mark both brackets before drilling. Re-drill if necessary.
- Light leaks at the sides: Add return panels or increase side rod extension.
- Panels crowd together in the center: Your rod may be too short. Extend it or use a longer rod.
Signs your measurements may need a revision:
- Visible light gaps between panels and the wall edge
- Panels that barely move when drawn open or closed
- A hem that touches the floor on one side but floats on the other
- Fabric that looks flat and lifeless rather than full and gathered
Why getting measurements right matters more than you think
After working through the technical steps, it is worth pausing on a point that most measuring guides overlook: the difference between a decent result and a genuinely refined one is rarely dramatic. It is almost always a matter of a half inch here, one inch there.
In professional drapery installation, millimeter-level accuracy is considered standard practice, not perfectionism. When a panel hem misses the floor by even three quarters of an inch, the eye picks it up immediately, even if the observer cannot name exactly what feels wrong. The room reads as “almost finished” rather than “complete.” That perception affects how buyers, guests, and even the homeowners themselves feel in the space every single day.
The conventional advice that circulates in DIY communities is to estimate and adjust later. That approach works reasonably well for furniture placement, but it fails consistently for window treatments. Custom curtains are not adjustable after the fact. A panel ordered too short cannot be lengthened. A set of panels too narrow for the rod creates gaps that no amount of rearranging will fix.
The insider truth from professional workrooms is this: the measurements that matter most are not always the ones homeowners focus on. Most people obsess over panel length and pay little attention to fullness ratios and return allowances. Those two factors actually have a larger visual impact than length by a significant margin. A generously full curtain at the right length transforms a room. A skimpy panel, even at perfect length, looks like an afterthought.
Reviewing hands-on installation lessons before finalizing any custom order helps confirm that your measurements translate correctly from wall to finished product.
Next steps: Upgrade your windows with custom curtains
You now have a solid, practical foundation for measuring any window with confidence. Accurate measurements are the starting point, but the fabric you choose and the craftsmanship behind your panels are what ultimately define the result.

Beautiful Windows Elgin offers a curated selection of premium fabrics, including jacquard satin, embroidered textiles, and upholstery-grade materials, all available by the yard with nationwide shipping. Whether you are ready to order custom panels, request fabric samples, or connect with a design consultant for guidance on fullness ratios and header styles, the resources are available to support every stage of your project. Precise measurements deserve equally precise materials. Browse the full fabric collection and take your window treatment from a careful measurement to a finished room you are genuinely proud of.
Frequently asked questions
What is the standard allowance for curtain width?
A good rule is to have curtain panels totaling 2 to 2.5 times the width of your window for proper fullness, as Martha Stewart advises extending the rod 4 to 12 inches past each side of the window frame for the best visual result.
Should curtains touch the floor or float above?
Drapes typically touch the floor or pool slightly for a formal look, while shorter curtains may float a half inch or so above the floor for easier cleaning in kitchens and high-traffic rooms.
How high above the window should I mount the curtain rod?
Mount the rod 4 to 6 inches above the window frame or near the crown molding to make the room appear taller, since higher rod mounting is one of the most effective ways to add perceived height to any room.
What’s the best way to measure a bay window for curtains?
Measure each section individually from the intended rod position down to the floor, and account for corner overlaps and wall returns so panels close cleanly at every angle, following the same principle that rod position drives all other measurements.
How can I avoid measuring mistakes?
Measure every dimension at least twice, write the number down immediately, and confirm that your floor measurements match on both sides of the window before placing any custom order.
Recommended
- Curtain Installation Guide: Achieve Perfect Window Dressing – Shop Designer Fabrics by the Yard | Curtains & Drapery
- Top tips for choosing drapery to transform your home – Fabric Store in Columbia, SC | Drapery Making Services
- Install Window Treatments in 1 Hour: Pro DIY Guide – Shop Designer Fabrics by the Yard | Curtains & Drapery
- Drapery Fabric Selection Guide for Custom Window Treatments – Shop Designer Fabrics by the Yard | Curtains & Drapery